
I think we can all agree that if you’re reading this blog, there are a handful of common interests we most likely share, for example: a love of postal items, sending things through the mail, and airmail stripes. It is also highly likely that you love items such as rubber stamps, all manner of paper/stationery, and books (whether old or new.)

Most RLD readers know that I am a biblio-nerd myself: I love book structures, sewing things together, and showing people how to make their own bookish creations. My favorite classroom moments occur when a first-time book maker completes final steps on The First Book They’ve Ever Made and you can practically see a lightbulb go off over their head. It’s incredible.

interior, American Bookbinder’s Museum (08.2015)
Now, imagine if you will: a museum in San Francisco that not only preserves the look and feel of a 19th C. bookbindery and print shop but in fact, invites people to skill share and interact with the museum’s equipment, so that participants can create their own “a-ha!” moments.

If that sounds interesting, then The American Bookbinder’s Museum is your kind of place! I stopped by their new SoMA space last week; I’d heard a rumor that they had a Rossback perforator nestled among the Albion hand presses and Smythe sewing machines.
Eureka! Within minutes, I had (presumptuously?) settled down to “get under the hood” of their Rossback and do a little bit of cleaning and scrubbing.
(all the while in the back of my head thinking “oh man, I hope they don’t think I’m some sort of weirdo book-gear stalker-y type…” I mean, WHO DOES THAT KIND OF THING? oh right…”nerds with a purpose”, my friend Sheree calls us…)

pro tools…
Every Rossback I’ve ever “met” is slightly different, once you start loosening screws and cleaning off the grit. My favorite tools for Rossback repairs? A toothbrush, some WD40, a flathead screwdriver, and a pair of nippers.

Rossback perforator, with the top bar removed. Bottom bar (brass color) is still in place.
Folks always ask me, so here ya go: I’ll discuss some Rossback basics, as far as parts and clean up are concerned!

looking down onto the top bar (removed from machine.) This piece is usually “shelf shaped”…
In the photo above: this is what the “top” bar of a Rossback looks like, once it’s been removed from the machine itself. See all those teeny little holes? That’s where the pins are placed! The pinheads rest atop each of those little holes.

The Museum’s Rossback had some slight variations I’d never seen before, including the one shown above. See where the (stripped) screw is? Well that brass piece is what I call the “bottom” bar. The (top bar) pin points travel through the pinholes on the bottom bar, on their way to the holes on the base plate of the Rossback (shown as the darker colored metal in the photo.) When perforating a sheet of paper, the paper slides in between the bottom bar and the base plate; this is also where the pins first make contact with the paper and perforating happens.
Back to the museum’s Rossback: the bottom bar was divided into two brass pieces, which I’d never seen before. And that small bent up piece of wire to the left of the brass piece? That’s a pin that somehow ended up that way.
Ah – mysteries!

you can’t quite see the pinheads resting in place, but trust me — they’re there!
Hey look! The Museum had ordered a new set of pins from NA Graphics, so I carefully (with the help of Museum Guru Jae) placed them into the top bar…

once the top bar was in position, I quickly placed a screw in one of the middle spots and attached the top bar. As you can see, I haven’t put the far left screw in place yet.
…and then was able to jimmy the top bar (by hand) into place with the bottom bar. Note: THIS IS TRICKY AND DOESN’T WORK WITH EVERY ROSSBACK. As you can see: the difficult part is aligning the top bar pins with the correct pinholes in the bottom bar. Each pin, every single hole, nothing crooked or at a slant.
If you get the top bar pins and bottom bar holes aligned correctly, everything should be fine when you press the foot pedal, moving the pins downward into the pinholes in the base of the Rossback. If you feel resistance or hear weird noises, stop what you’re doing! Either scenario usually means that there’s a crooked pin somewhere or the alignment of parts/pieces is a little off. I usually loosen some screws, triple check my work, and carefully re-apply pressure where needed.
See? TRICKY.
(side note: my Rossback at the RLD studio doesn’t play “nice” like this one; I have to hand set each and every single pin, which makes for a much longer “deep cleaning” process. That’s what I mean when I say every one of these machines is different in some way…)

smythe sewing machine: sew up textblocks in a jiffy!
After doing a victory dance (it IS wonderfully satisfying to have all those pins travel downward into their respective places, and not hear a single shearing noise…) I wandered around the rest of the space, taking in the various equipment on display.
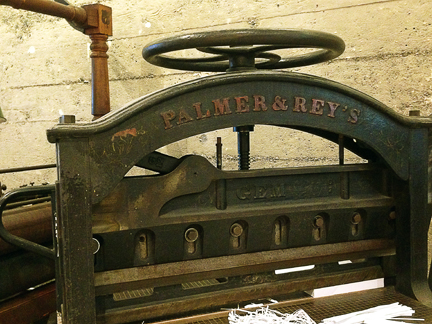
palmer and rey’s “magic cutting machine” — not it’s official name, but that’s what I call it!
One of the ABM’s goals is to have a group of docents and volunteers who are well-versed on each machine, in order to show visitors how the equipment functions while working on projects of their own. Each machine at the museum will be fully operational; all equipment has been sourced from different binderies and print shops across the country (sometimes traveling great distances to find a new “forever home” at the museum.)

leftover evidence, palmer and rey…
A bit of historical perspective from the Michigan State University Library: “The early 19th century was an era of transformation for bookbinding. With the increase in the demand for books, binders turned to mechanization to meet this challenge. Publishers also began to take control of the whole book-making process, from editing to printing to binding.”
Operational 19th century gear to help you make books quickly? That’s what you’ll find at the ABM!

litho stone…is that an ad for “pure rye whiskey”?!?!
Although the museum has not formally opened its doors to the public yet, interested parties are invited to stop by and say hello. Additionally: if you’re interested in learning how to operate any of the above mentioned machinery and/or volunteering at the museum, you can fill out a form online and museum staffers will get in touch. The ABM also has a monthly “volunteer meet up”; you can stop by and see the sights in person, if that’s more your style. (next meet up: tonight! Tuesday, August 18th!)

All that being said, I’m off to use the museum’s industrial stapling machine – SF Zine Fest is coming up and I’ve got a MOUNTAIN of work to do! FAST! Who wouldn’t want to staple 100 zines in approximately 20 minutes?
Whoah!
–JH


